EPortfolios for Culpeper
ePortfolio Templates have been created for use by students in both the Spanish and French sections of the Department of Modern Languages, Literatures, and Cultures. The ePortfolios were created to be edited using Adobe GoLive. The templates are supported by the staff of the Culpeper Language Center and students who are using the templates are strongly encouraged to do their work in the Culpeper Center.
Contents
- 1 What's in a template?
- 2 Getting Started
- 3 Tips for working with your ePortfolio
- 4 Frequently asked GoLive questions
- 4.1 I can’t find the Inspector! Where is it?
- 4.2 How do I add a new row to a table?
- 4.3 How do I create a new .html document?
- 4.4 How do I create a link?
- 4.5 How do I add a picture?
- 4.6 How do I resize a picture?
- 4.7 My picture shows up in the program but not on the web, what’s wrong?
- 4.8 How do I change the background or text colors?
- 4.9 How do I add a sound file?
- 4.10 My sound file shows up as a black box, what’s wrong?
- 4.11 How do I italicize, bold or change the font size?
- 4.12 How do I change the background or text colors?
- 4.13 How do I add a sound file?
- 4.14 My sound file shows up as a black box, what’s wrong?
- 5 Other Helpful Sites
What's in a template?
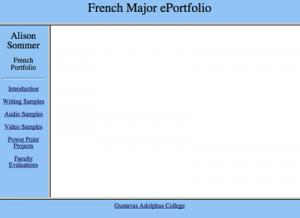
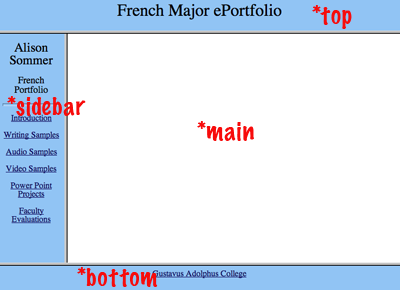
Both templates have the same basic lay-out. They have an "index.html" which is the main page you see when you first visit the site. Within the index there are 4 frames: sidebar, top, bottom and main. Each of these parts corresponds to a different .html file. Sidebar, top, and bottom will all remain the same when you are going through the site. Main, however, will change depending on which of the options you choose from the sidebar menu.
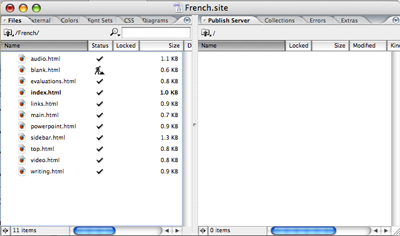
Once you have your template in place and have it opened in GoLive (see below for instructions on how to do that), you will see that there are separate .html files for each part of the site corresponding to each of the items on your sidebar (sidebars may be slightly different depending on your class/language).
Getting Started
To get started you will need to download the template for your specific language, unzip it and place it into your wwwdoc folder. The template is available for download here:
Once you have placed the "Spanish" or "French" folder into your wwwdocs folder you will be able to view your site online. The URL will be: http://homepages.gac.edu/~username/Spanish/ (where "username" should be replace by your e-mail username and "Spanish" may be replaced with "French". Note: Spanish and French must be capitalized in the URL or the site will not be found.
To begin working on your site, once you have followed the steps above, you should double-click on the file called spanish.site or french.site. This will open up your site in Adobe GoLive. From there you may begin to edit your site.
Tips for working with your ePortfolio
- Do not edit the file titled index.html - this is the file which pulls your site together, and unless you have previous experience with webpage design you should not attempt to edit this file.
- When you are done editing a file just choose "save" NOT "save as" (unless you are working with blank.html).
- When naming files for use online avoid special characters (such as accented letters) or blank spaces as these may confuse the web browsers.
- All files which you want to have displayed on your site MUST be saved inside your wwwdocs folder, preferably inside your "Spanish" or "French" folder within your wwwdocs folder.
- When viewing your site online you may need to refresh individual frames for your most recent changes to appear. To do this right click within the site and choose reload
Frequently asked GoLive questions
These FAQs are intended as a help guide for students using GoLive CS2 to create and maintain language ePortfolios. Here are some quick Golive FAQs to help with your ePortfolio. Please see the center assistants or Culpeper director for any additional help.
I can’t find the Inspector! Where is it?
If the inspector disappeared it is easy to get back. Go to the Window menu and find “Inspector” this need to be checked for it to display.
How do I add a new row to a table?
Place your cursor at the end of the last space in the table and press tab, a new row should appear. You can also go Special > Table > Insert Row Below
How do I create a new .html document?
There are two ways to create a new .html document if you are working with one of the pre-constructed language templates. The easiest way is to open the document “blank.html” and choose “save as” and name it something new, this will create a new .html file without erasing the “blank.html” file. Or you can right-click within the GoLive directory and choose New > HTML Page. If you are not working within the template, the second option will be the only option available to you.
How do I create a link?
Highlight the item you want to become the link (such as text or an image), then in the inspector (right hand of the screen) type the URL of the file you wish to link to, or, of you are linking to a file that is a part of your site, click on the folder icon in the inspector, this will open up a window, in this window find the file and choose “ok”.
How do I add a picture?
Find the image icon on the pallet on the left of your screen and drag it into position on your page. Then, in the right hand corner, on the “Inspector” pallet, click on the folder icon. This will open a dialog box that will allow you to search for your image and choose it. Make sure that the image is located in your wwwdocs, or a sub-folder of your wwwdocs folder or it won’t show up on the web!
How do I resize a picture?
To resize a picture simple click on the picture, hold down one of the little blue squares located on the side of the image, as pictured below, and drag the image into its new size.
Note: if a picture is large you might want to change the size of the picture in Adobe Photoshop instead of merely re-sizing it, since a larger image, even after resizing in GoLive, will take a long time to load and consume more file-space in your Home Directory.
My picture shows up in the program but not on the web, what’s wrong?
There could be three different reasons for this: 1. You may need to refresh your web browser; right-click within the part of you page where the image should be and choose "refresh". 2. The image is not in your wwwdocs folder, and is therefore not published on the web. To fix this simply put the file into your wwwdocs folder or one of its sub-folders and then try re-adding the picture. 3. The image’s path may be wrong. This problem is tricky with GoLive. If you click on the picture and the file name that shows up in the inspector is very long or contains “…/…/” you should delete the picture, make sure its in the proper folder and try again. If it is still not working you may need to have somebody look at the code, if this is the case please ask a center assistant or Ryan Furness for help.
How do I change the background or text colors?
First, click on the button marked “properties” on your site page, a new set of options should then appear in the inspector, check the box next to the color you wish to change, then go to the color pallet bellow and pick a color.
How do I add a sound file?
Adding a sound file is essentially the same as adding an image, but instead of dragging the image icon over, you will choose the sound icon. Then follow the same steps as for an image.
My sound file shows up as a black box, what’s wrong?
The program might have the sound type wrong. Click on the sound icon and then look over at the inspector, make sure to choose the “Audio Basic” option under the MIME menu.
If that doesn’t fix you file make sure your file is in .mp3 format, if not you will have to fix the file before you will be able to embed it to make it an mp3 (use Audacity for this).
How do I italicize, bold or change the font size?
Up at the top of the program there are these choices, much like in Word, they just look a bit different, as they are all demonstrated using the letter T. Simply select the text you with to make bold or italic, then click on the appropriate button above.
How do I change the background or text colors?
First, click on the button marked “properties” on your site page, a new set of options should then appear in the inspector, check the box next to the color you wish to change, then go to the color pallet bellow and pick a color.
How do I add a sound file?
Adding a sound file is essentially the same as adding an image, but instead of dragging the image icon over, you will choose the sound icon. Then follow the same steps as for an image.
My sound file shows up as a black box, what’s wrong?
The program might have the sound type wrong. Click on the sound icon and then look over at the inspector, make sure to choose the “Audio Basic” option under the MIME menu.
If that doesn’t fix you file make sure your file is in .mp3 format, if not you will have to fix the file before you will be able to embed it to make it an mp3 (use Audacity for this).


