Google Calendar

Google Calendar is a web-based group calendaring application hosted by Google.
Gustavus uses a special education edition of Google Calendar as its campus-wide calendaring application. If you are a Gustavus employee or student, you can use Google Calendar to manage or share your calendar and schedule meetings with other people at Gustavus.
Google offers a general tutorial that is not Gustavus-specific, so some things may look slightly different and some features available to Gustavus users may not be covered.
Contents
- 1 Using Google Calendar
- 2 Tips
- 3 Syncing Google Calendar with Other Programs/Devices
- 4 External links
Using Google Calendar
Logging in
To log in to Google Calendar:
- Visit http://google.gustavus.edu/
- Enter your Gustavus username and password
- You should be taken to your Google Calendar
Calendar views
One day, one week, and one month are the most common ways to view your calendar. You can choose how to view your calendar by clicking on the appropriate tab near the top of the page.

Adding Events
There are many ways to add an event to your Google Calendar. One of the easiest is to:
- Click and drag on your calendar at the date and time you want the event to be.
- Enter a description of the event. Pro Tip: If you want to adjust the time, simply put the time the event starts before your description.
- Select the calendar you wish to add the event to.
- When you are satisfied with the event click "Create Event." If you want to add more details, such as a location, description, or guests, click "edit event."

You can also add events by using the Create button. The Create Event window allows you to add more event details.
You can also create events by using the Quick Add Feature. Click the pop-down on the Create button, add your description and click Add.

For more information on using Quick Add see: About Quick Add.
Editing Event Details
To edit an existing event, simply click on the event title in your calendar. Make your changes to the event details window and click SAVE.

You can also change the date and time of an event by clicking and dragging it to a new location on the calendar. You can extend or shorten by using the window shade option at the bottom of an event.
Additional Event Details
Inviting Guests

Find or create the event you would like to invite guests to and select event details.
- Enter their e-mail addresses (using the @gustavus.edu domain portion) in the Add guests section. You can invite email aliases in this section as well. The "Allow list membership to be viewed by all members." check box must be checked in the email list settings for this feature to work.
- To check for available times, click Suggested times.
- You will then see a list of available times for your meeting. Select a meeting time. Click Save in the Event Details window. You will be prompted about sending invitations to the guests. Invited guests will appear in parentheses on the event on your calendar.
Setting Reminders or Notifications
Google Calendar can remind or notify you of events on your calendar in multiple ways. If you would like to receive a reminder you can choose to receive one by a pop-up window (if you have Google Calendar open), an SMS text message sent to your cell phone, or by e-mail. Reminders and notifications can be sent globally (all events created have those settings) and individually (each event can have different reminders and notifications).
Individual Event Reminders are set in the Event Details window. You can select both the type of reminder and the time before the event you would like to be notified.
Global settings are set in the Google Calendar Settings. From the Gear tool, select Settings, select the Calendars tab, on the calendar you wish to edit click the Reminders and notifications link. Here you can set the default settings.
Available or Busy
Google Calendar allows you to show yourself as available or busy during the events on your calendar. For example, if you have to be in class, you are probably busy; however, if it is your birthday you may be available to go to an event. This information is for others who are viewing your calendar or availability.
Privacy
Google Calendar allows you to set privacy for individual events and calendars. Default options are different for students and employees.
| Who and What Calendar | Default Setting | Meaning |
|---|---|---|
| Students/All Calendars | Private | Only you and people you give permission to can see the events |
| Employees/Primary Calendar* | Show Free/Busy | Gustavus users can see free/busy on your calendar |
| Employees/New Calendars | Private | Only you and people you give permission to can see the events |
(*) Employees who have shared their calendar with students with full access will not show free/busy by default.
You can adjust the event sharing details in the event details.
Adding Appointments
As a Google campus, GTS strongly recommends using Google Calendar to schedule remote appointments. Through your calendar, you can create open appointments that students or faculty can claim, or invite select participants.
Create an appointment:
- Using your Gustavus account on a computer, open Google Calendar.
- Make sure that you're in Week view or any Day view.
- Click anywhere in the calendar. In the event box that pops up, click Appointment slots.
- Enter the details, including a title, and pick the calendar where you want the event to show up.
- To add more information, like a location or description, click More options.
To add select participants:
- Open Google Calendar.
- Click on the appointment you have created.
- Select the pencil icon, named Edit event.
- To the right-hand side, click the Add guests field and enter the address of your attendee.
If you are sharing with multiple people and would rather provide a link, such as when publicly posting your appointment availability, Google generates one for you automatically.
Posting appointment links:
- Open Google Calendar.
- Select your appointment and click the three dots to the far end of the appointment pop-up window.
- Choose the Publish event option.
- Copy the link provided and paste where needed.
Calendar Settings
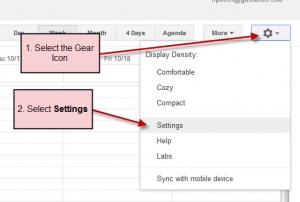
The settings for Google Calendar are available by:
- Clicking the Gear icon (upper right hand corner)
- Selecting Settings.

The General Tab allows you to change the information specific to your calendar, such as the language, country, timezone and time format you prefer to use. They are all user specific, and you can change them in the pop-down menus. The Default View is the view that loads when you first load Google Calendar. Custom View is a customizable view that adds a different option in the view choices across the top of the calendar.
The Calendars Tab shows you the calendars you have access to and allows you to change the settings for those calendars.
The Mobile Setup Tab allows you to set up your cell phone to receive notification of events and agendas from your Google Calendar.

The settings for each individual calendar are set from the settings pop-down next to the calendar listing, or by clicking on the individual calendar on the Calendars Tab of the Settings.
On the Calendar Details tab, you can change the name of the calendar, or supply a description of the calendar. This tab also allows you the option of embedding your calendar into an existing webpage. It also supplies you with web addresses for your calendar.
Sharing Your Calendar
To set the sharing options, select Share this Calendar option (from the pop down settings next to the calendar listing), or click the Shared:Edit settings on the Calendars Tab of the Calendar Settings.
In the Share with specific people section, add the username of person you wish to share with (including the @gustavus.edu domain for the Gustavus community), and select the type of sharing from the chart below. You can share your calendar with any other Google Calendar user in the world.
| Setting | Allows user |
|---|---|
| Make changes AND manage sharing | complete control over your calendar. |
| Make changes to events | ability to add and remove events on your calendar, but not adjust sharing |
| See all event details | to see all the event details, but they are not allowed to make any changes |
| See only busy/free | to see only that you are busy or free. |
Reminders and Notifications
To manage Notifications, you must go to Calendar Settings by clicking the gear icon in the top-right of the web page, and select Settings. On the Calendar Tab, and you will see the Reminders and notification link next to the name of your calendar. You can set the default setting for the events on the calendar, and settings for invitations you receive on this page.
Some users receive Email messages just prior to each calendar event, including classes. You can turn these Notifications off by removing the Email option under the Event Reminder section of the Notification settings for your Calendar.
SMS or Text Message Notification and Use
Google Calendar supports SMS (or text messaging) notifications and communication. In order to use this service, you will need to register your phone with Google Calendar. From Calendar Settings, select the Mobile Setup tab. Complete the information and verification.
Once you have enabled SMS, you will have an additional option in the Notification and Reminders sections for events and calendars.
To receive a notification with your calendar information, send a text message containing one of the following commands to the shortcode '48368' (GVENT):
   * 'next': request your next scheduled event
   * 'day: request all of your scheduled events for the present day
   * 'nday': request your events scheduled for the following day
You can also create an event with SMS by sending a text message with your event's details to the number above.
For example, if you send a message with something like "Chemistry Final 1pm Saturday," Google Calendar can figure out what you mean and pop the new event into your calendar.
Note: Only event information from YOUR calendar can be received or updated. This service is free, you will not be charged by Google to use this.
Adding, Creating, and Managing Additional Calendars

You can have and view multiple calendars.
Add (Create) a New Calendar
To create a new calendar, that you own, click the Create new calendar from the pop-down at My calendars. This page allows you to create a new calendar and set the sharing options for that calendar. Once created, the calendar will show up in your list of calendars.
Add a Friend's Calendar

There are multiple ways to add and view a friend's calendar.
- You can add (view) a friend's google calendar in the Add a co-worker's calendar slot under Other calendars.
- You can select Add a friend's calendar from the Other calendars pop-down.
- You can also add by URL.
Hiding a Calendar
Google Calendar allows you to toggle the viewing of a calendar on and off by clicking on the name of the calendar in the calendar list.
Removing a Calendar
- Go to settings (in the upper right corner)
- Select the Calendar Tab
- Click the Delete Icon next to the Calendar you are trying to remove.
- Accept the confirmation.
Importing and Exporting Calendars
Importing calendar data from another source
Google Calendar allows you to import data from other calendar programs. It accepts data in iCalendar and CSV formats. From the Other calendars pop-down select Import calendar. For additional help with importing please see Google's Import and Export Help Pages
Meeting Maker
Gustavus used Meeting Maker before Google Calendar, and the conversion caused some issues. Following are the solutions we found.
Due to a limitation in Meeting Maker, you will need to export your non-banner events and your banners from Meeting Maker separately.
To export non-banner data from Meeting Maker, within the Meeting Maker application, select File, Export as ical by date (export a single file). This will allow you to create an *.ics file that can be imported into Google Calendar.
To export your banner data from Meeting Maker, within the Meeting Maker application, select File, Export as Text.... Select the date range you want to export and uncheck the "Contacts" and "To-Dos" and click OK. Then upload the file to https://gts.gac.edu/gts/mmconvert/ which will give you a *.ics file that can be imported into Google Calendar.
To import data into Google Calendar (if you have both banner and non-banner events from Meeting Maker, you will have to import both of the *.ics files):
- From the Add button at the bottom of the calendar list select Import Calendar.
- Browse to the iCalendar file (*.ics from Meeting Maker export) that you created in your export.
- Choose the calendar that you wish to import the data to.
- Click the Import button.
- You will receive a confirmation regarding the number of events that were imported.
The social-networking website Facebook provides a service for creating social events, and allows users to subscribe to an iCalendar resource containing their events. For more information, see Facebook - Calendaring and Facebook.
A Different Google Calendar Account
If you would like to import a calendar from a different Google calendar account, Google provides a way to export your calendars as a zip file in *.ics format
To export a Google Calendar:
- Log into your Google account and navigate to the Google Calendar page.
- Select Settings from the pop-down next to My calendars.
- Click the Export Calendars link. This will download your calendars to a zip file. If prompted, select Save File.
To import a Google Calendar:
- Log into your Google account and navigate to the Google Calendar page.
- Select Settings from the pop-down next to My calendars.
- Click Import calendar.
- Browse to the file you just created in the export.
- Choose the calendar that you wish to import the data to.
- Click the Import button.
- You will receive a confirmation regarding the number of events that were imported.
Tips
Selecting a custom date range
You can view a custom date range (for example, a three week period, or the two days of the nobel conference) by clicking dragging your mouse over the mini-calendar on the left hand side of the screen.
Printing the Description Field for Events
To print the information in the Description Field for events from Google Calendar:
- Switch to Agenda View
- Select Print (from the More button)
- Check the Print Descriptions checkbox.
Task List
This list allows you to check off tasks through out the week or month as you complete them. To access yours simply select Tasks under my calendars on the left hand side. Once selected, the tasks list will appear on the right hand side of your calendar regardless of what viewing option you are in.
To add something to your task list, click right between the two yellow lines at the top, or click the + button at the bottom of the task list and begin typing. This will add tasks to your list. Simply press enter when you are finished typing. To remove items from your list, click on the item you want removed and click the trash can at the bottom of the tasks list.

There are other actions you can do with your list, for example making a new list, refreshing an old list, or renaming a list. To do this, click on the icon in the bottom right hand corner of the task list.
The Actions icon, lower left corner of task list, will give you even more option for your task list.
Syncing Google Calendar with Other Programs/Devices
It is possible to synchronize your Google Calendar with many smart phone, and desktop computer programs.
For directions on syncing Google Calendar please see Google Calendar Syncing